February 23
More Homemade Pasta
Menu
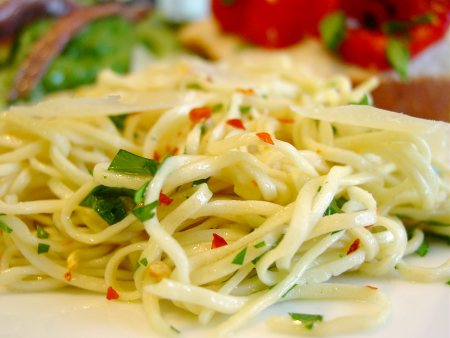
- Spicy Anchovy, Garlic, and Oil Sauce [View Recipe]
Quick View
Ingredients
- .67 batch pasta
- 2 cloves garlic
- salt
- 3 tablespoons oil
- 1.5 large anchovies (minced)
- hot pepper flakes
- 1 tablespoon parsley (chopped)
- cheese
Instructions
We start this dish by filling our large pasta pot with water, covering, and heating it over medium heat.
On our cutting board, we smash the garlic cloves with the side of our chef's knife. This allows us to easily remove the peels. Then we cut off the hard root ends, and mince the cloves with a pinch of salt. We get about 1/2 tablespoon of minced garlic.
We place our saute pan on the stove, add the garlic and olive oil and begin heating this over low heat. When the garlic starts to sizzle, we add the minced anchovies and a pinch of red pepper flakes. We cook over medium-low heat for a few minutes. We do not want the garlic to brown, we just want the anchovies to disappear into the sauce. We stir and the sauce is done, we remove it from the heat and wait for the pasta.
Meanwhile, the water has come to a boil. We lower it and wait for the <a day="23" label="pasta">fresh pasta</a> to be cut.
We add the fresh pasta and a pinch of salt to the boiling water and stir. We put the sauce back on medium-low heat. We cook the pasta for about 1.5 minutes until it is just tender. We mean to remove about 1/4 cup of pasta cooking water to be added to the sauce if necessary, but we forget!
When the pasta is cooked, we drain it in a colander and pour the linguine into the sauce. We stir with tongs, add the parsley, and serve with additional hot pepper flakes and freshly grated Locatelli. We reserve some of the fresh pasta for the kids and enjoy the rest with this sauce. Wonderful!
- Homemade Linguine [View Recipe]
Quick View
Ingredients
- 2 large eggs
- 1.5 cups flour
- 2 teaspoons water (divided)
- .25 teaspoon oil
Instructions
We start by making the dough. We break each egg into a small bowl and then pour into the bowl of our 6-quart KitchenAid <a href="/tools/appliances/kitchenaid/">stand-up mixer</a>. With the flat beater, we turn the machine to stir speed and beat to mix up the eggs.
Next, we add the flour with the machine off, trying to keep the beaten eggs in the middle with a wall of flour all around them. We turn our mixer to speed 2 and mix for 20 seconds. We add half of the water and the olive oil and mix again for 20 seconds. We scrape the dough off the beater with a spatula and switch to the dough hook. We knead on speed 2 for about a minute and a half. The dough seems like it can take more water so we add half a teaspoon of water and knead again for another minute. We add the rest of the water and knead again on speed 2 for a minute.
At this point the dough looks good - elastic and a little sticky. We remove the dough from the mixer and hand knead it for a minute on our cutting board. We wrap it in plastic wrap and set it aside for 30 minutes to rest.
After about 15 minutes of the dough resting, we put a large pot of water on the stove to cook the pasta. We turn it on medium-high heat.
When the dough is ready, we cut it into four pieces and flatten each piece by hand. Once we have flattened the pasta to about ½ inch thick, we prepare to feed it into the <a href="/tools/appliances/kitchenaid/pasta_roller.html">pasta roller</a> attachment of our KitchenAid <a href="/tools/appliances/kitchenaid/">mixer</a>.
We start with the pasta roller on its widest setting - 1. We feed the dough into the roller, with the mixer on speed 2. We are careful not to push the dough into the roller, nor pull it as it emerges from the opposite side. Having the attachment for the KitchenAid is wonderful as we do not have to exert any effort. The roller does all of the work and does it well.
After feeding the dough into the roller, we fold the dough and feed it back into the roller. We do this five or so times to work out all of the air bubbles. It is not necessary to add additional flour - the dough is smooth and easy with which to work.
We then decrease the roller width to two and feed the dough into it. We decrease the width to three and repeat the process. Finally, we repeat the process at settings of four and then five.
As we make our 4 long sheets of pasta, we place them, sprinkled with a little flour and folded halfway, on our cutting board. We remove the pasta roller and attach the cutter. We feed each piece of dough into the linguine cutter. Our daughter helps by "catching" the linguine as they are cut, as we watch her very closely around the working machine! We place a "nest" of noodles back on the cutting board when they are cut, and repeat until all the linguine are ready to be cooked.
We add the fresh pasta and a pinch of salt to the boiling water and stir. We cook for a minute, taste, and cook until the pasta is just tender. This takes about a minute and a half. When the pasta is cooked, we drain it in a colander and pour the linguine into the sauce. We toss and serve!
- Fresh Italian Bread
- Caesar Salad
- Roasted Red Peppers with Balsamic Vinaigrette
The difference between fresh pasta and dried is so stark that it more than justifies the minimal effort afforded by the KitchenAid. We can almost taste the lasagne, ravioli and more linguine!
We should note that while we are marvelling over our creation, our children enjoy their pasta with their own favorite sauce - plain tomato.